

Assumed knowledge
To get the most out of this tutorial, you should have an understanding of:- Basic knowledge of Python.
- How to write Airflow Dags in Python.
- Airflow task groups and Airflow operators.
Prerequisites
- The Astro CLI using at least version 1.40.
Step 1: Set up the project
-
Create a new Astro project. Delete the
dags/example_astronauts.pyfile. -
Add the blueprint package to your
requirements.txtfile. Make sure to pin the latest version.
Step 2: Write a template class
A blueprint template is a Python class that inherits from theBlueprint class and defines a render() method. The render() method returns an Airflow TaskGroup or a single operator.
-
In your Dags folder, create a subdirectory called
templateswith one filemath_etl.pyand add the following scaffolding code.Thedags/templates/math_etl.pyMyMathETLConfigclass contains the definition of each configurationFieldthat is available to the end user using the template in a Dag. The template classMyMathETLBlueprintinherits fromBlueprint[MyMathETLConfig], which ties the blueprint to that configuration model. The class’srender()method returns aTaskGroupthat contains the tasks to be executed when the blueprint is used in a Dag. -
Fill the
MyMathETLConfigclass with two fields:my_numberandmy_name.dags/templates/math_etl.py -
Add a
TaskGroupto therender()method that contains three tasks:extract,multiplyandprint. Make sure therender()method returns the task group object. Note how you can access the configs provided by the end user inside the blueprint template by usingconfig.my_numberandconfig.my_name.dags/templates/math_etl.py
Step 3: Generate the blueprint schema JSON
If your end users are using the Astro IDE to create blueprint Dags, you need to generate a JSON schema file that describes the blueprint configuration model. This file is used by the Astro IDE to validate the configuration fields and provide a visual interface for the end user to configure the blueprint.-
Create a new folder at the root of your project called
blueprintand create a subfolder calledgenerated-schemas. -
Run the following command to generate the blueprint schema JSON file for your template.
Generated schema file
Generated schema file
blueprint/generated-schemas/my_math_etl_blueprint.schema.json
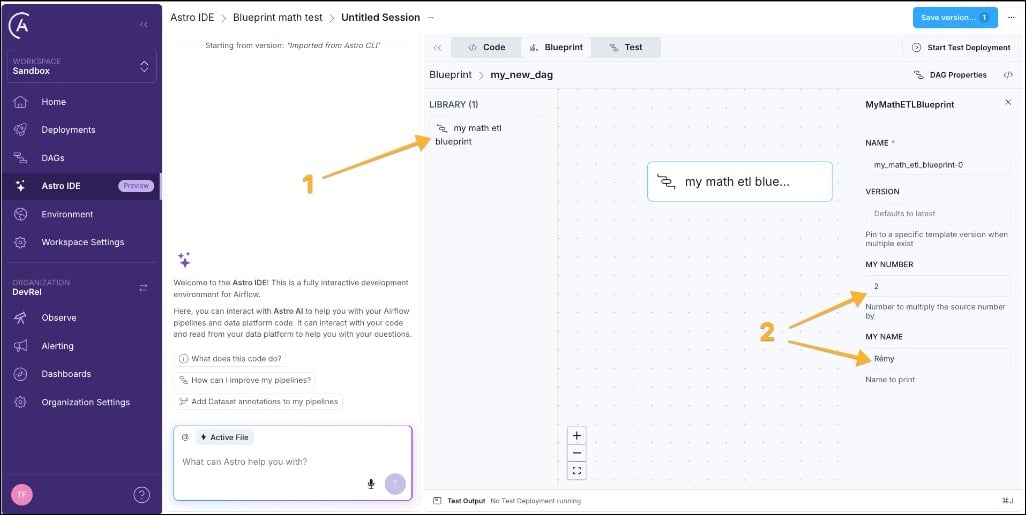
blueprint/generated-schemas directory, importing this Astro project into the Astro IDE will automatically generate an entry in the Library of the blueprint interface, for users to build Dags using drag-and-drop. Users can drag the blueprint node (1) to the canvas and configure all input fields in the form to the right (2).
Step 4: Add a Dag loader file
When you create a Dag using blueprint in the Astro IDE, the Astro IDE automatically creates a YAML file for the Dag. This YAML file references the blueprint using theblueprint key. To make Airflow aware of this Dag, you need to add the Dag loader file.
-
Create a new file in the
dagsfolder calledloader.pyand add the following code. Note that for Airflow to parse the file, it needs to include either the stringairflowordag(case-insensitive). You can toggle this behavior by setting the[core].dag_discovery_safe_modeconfiguration toFalse.This function call discovers alldags/loader.py*.dag.yamlfiles in thedagsfolder and resolves the referenced blueprints, validates configurations, and creates Dag objects that can be picked up by Airflow.
Step 5: Write a Dag using the blueprint with YAML
Of course, you can also directly use blueprints in YAML without using the Astro IDE.-
Create a new YAML file in the
dagsfolder calledmy_math_etl.dag.yamland add the following code. Note that the filename needs to end with.dag.yamlfor the blueprint loader to pick it up by default.dags/my_math_etl.dag.yaml -
You can add as many blueprints within the
stepskey as you want. Dependencies are set using thedepends_onkey.dags/my_math_etl.dag.yaml -
(Optional) You can test your blueprint Dag like any other Dag in a local Airflow environment. Start Airflow using
astro dev startand run your Dag in the Airflow UI.
(Optional) Step 6: Version a blueprint
As your blueprints evolve, you might need to introduce breaking changes to a configuration schema. Blueprint supports versioning so existing Dag YAML files continue to work while new ones can use the updated schema. You apply the same pattern toMyMathETLBlueprint when you publish a MyMathETLBlueprintV2 (or later) class.
Each version is a separate Python class. The initial version uses a clean class name (implicitly version 1). Later versions add a V{N} suffix:
- To add a second version of your blueprint, create a new class called
MyMathETLBlueprintV2and make any changes to the contents that you want.
dags/templates/math_etl.py
- To use the new version in your YAML, add the
versionkey to the blueprint step.
dags/my_math_etl.dag.yaml