

- Google OAuth
- GitHub OAuth
- Local username/password
- Users no longer need to repeatedly login and remember credentials for their account.
- You have complete ownership over credential configuration and management on Astro.
- You can enforce multi-factor authentication (MFA) for users.
- Microsoft Entra ID
- Okta
- IdPs managed through Auth0
- Amazon Cognito
The following setups assume that you are using the default Astronomer implicit flow as your authorization flow. To implement a custom authorization flow, see Configure a Custom OAuth Flow.
- Microsoft Entra ID
- Okta
- Auth0
- AWS Cognito
- Local auth
- General OIDC
Step 1: Register an application using App Registrations on Azure
- In Microsoft Entra ID, click App registrations > New registration.
-
Complete the following sections:
- Name: Any
- Supported account types: Accounts in this organizational directory only (Astronomer only - single tenant)
- Redirect URIs:
- Web /
https://houston.BASEDOMAIN/v1/oauth/redirect/. - Web /
https://houston.BASEDOMAIN/v1/oauth/callback/.
- Web /
BASEDOMAINwith your own. For example, if your base domain isexample.com, your redirect URIs should behttps://houston.example.com/v1/oauth/redirect/andhttps://houston.example.com/v1/oauth/callback/. - Click Register.
- Click Authentication in the left menu.
- In the Web area, confirm the redirect URI is correct.
- In the Implicit grant and hybrid flows area, select Access tokens and ID tokens.
- Click Save.
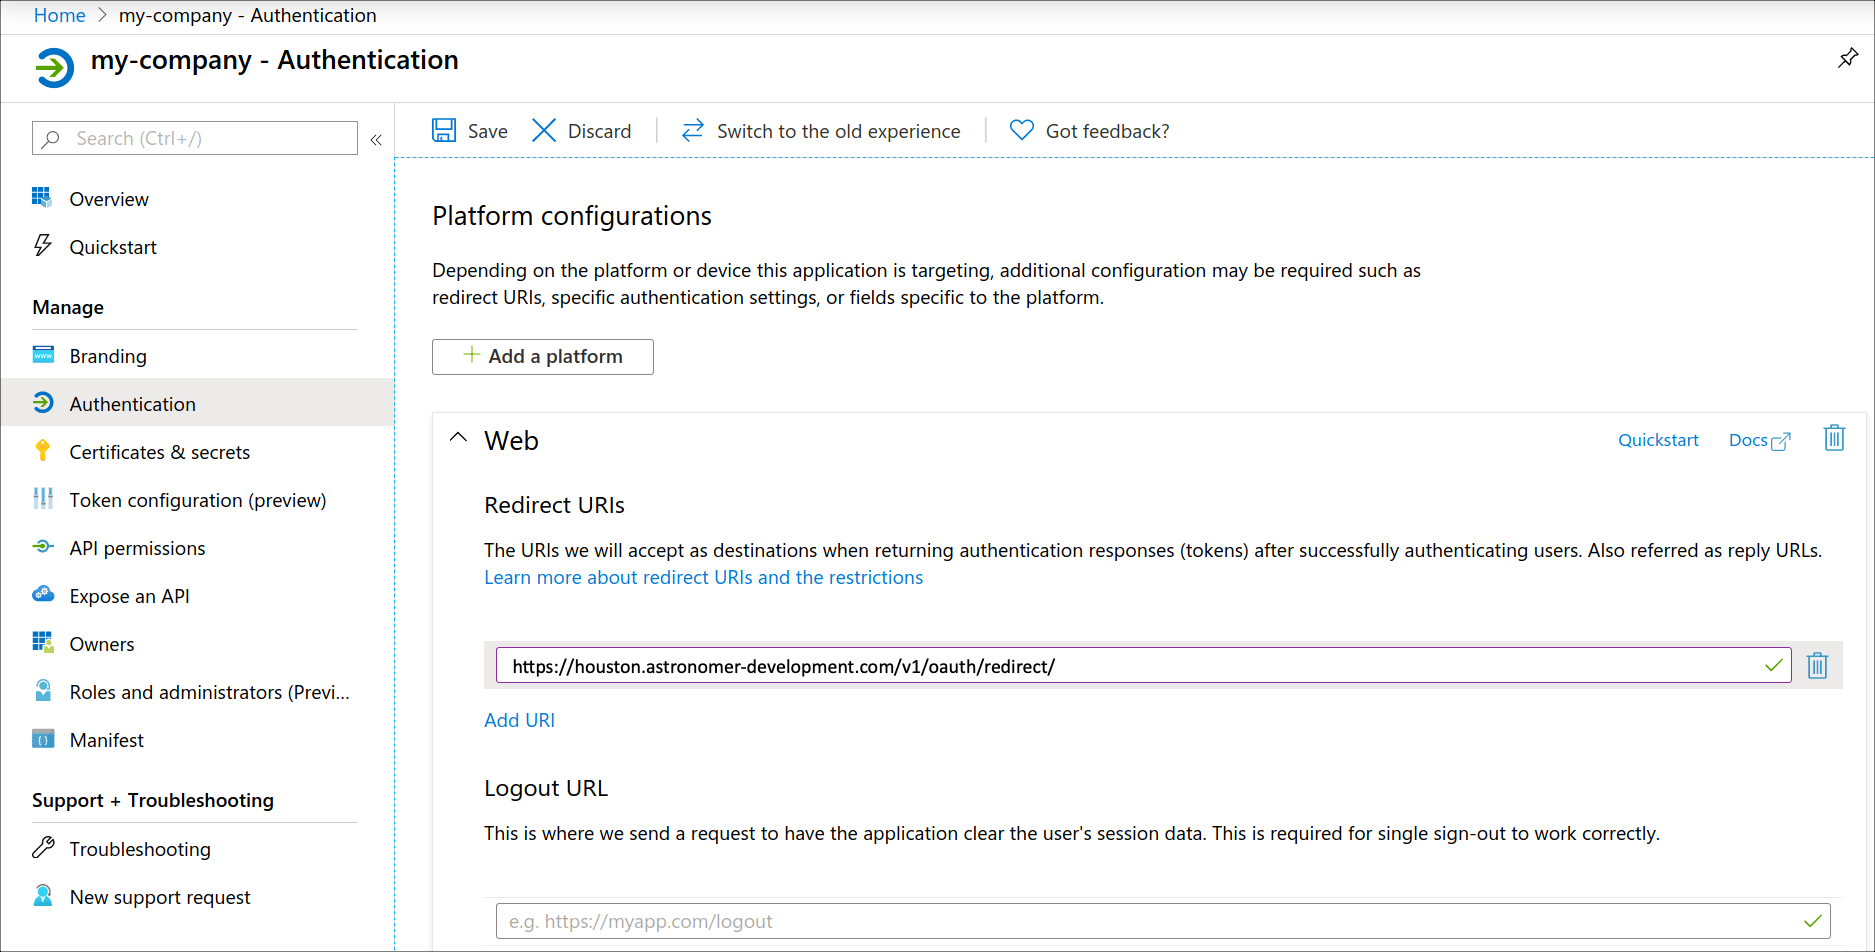
Step 2: (Optional) Create a client secret
Complete this setup only if you want to import Microsoft Entra ID groups to Astronomer Software as Teams.- In your Microsoft Entra ID application management left menu, click Certificates & secrets.
- Click New client secret.
- Enter a description in the Description field and then select an expiry period in the Expires list.
- Click Add.
- Copy the values in the Value and Secret ID columns.
- Click API permissions in the left menu.
-
Click Microsoft Graph and add the following minimum permissions for Microsoft Graph:
emailGroup.Read.AllopenidprofileUser.Read
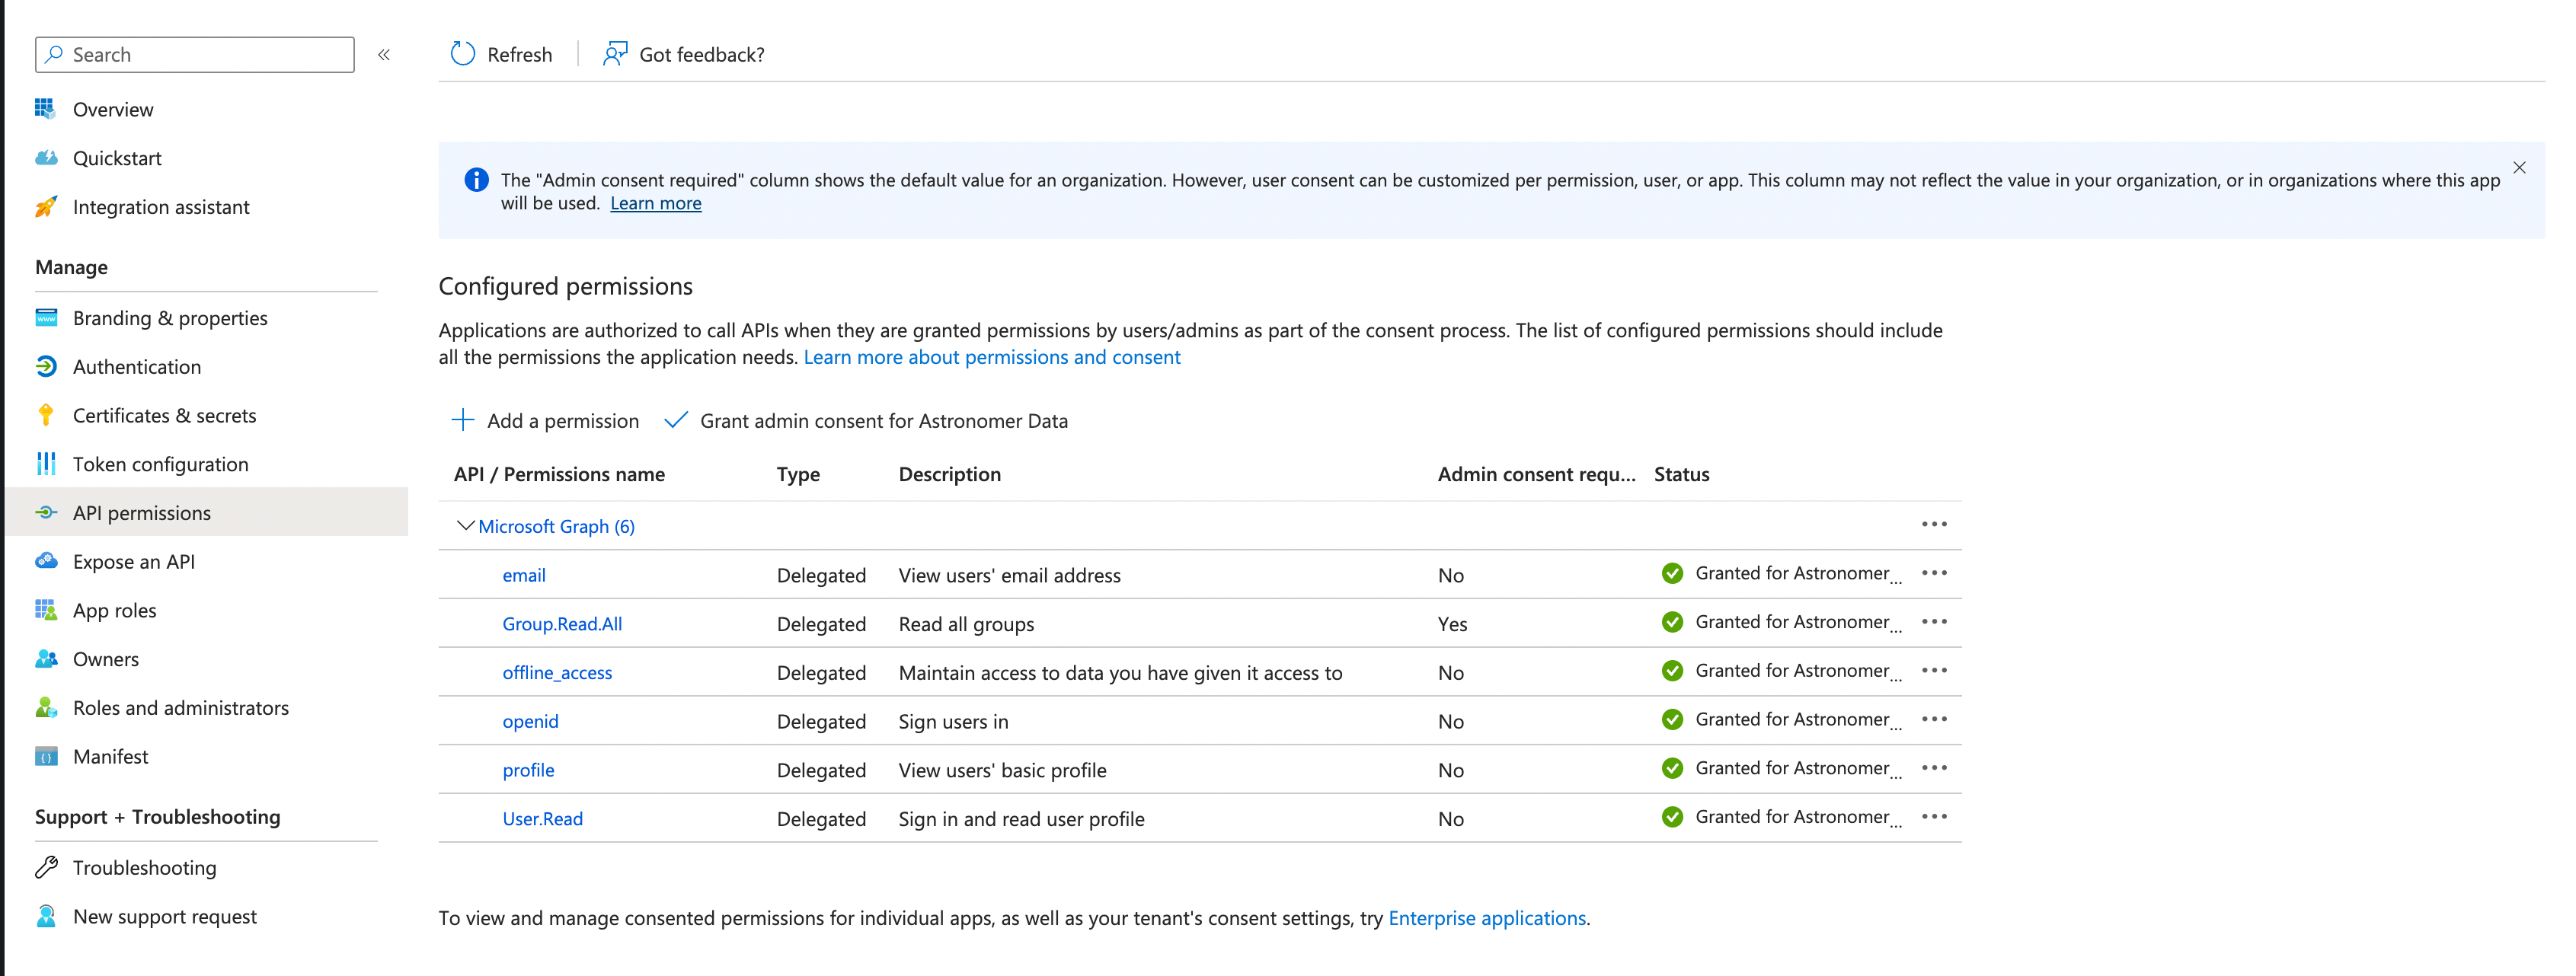
- Click Token configuration in the left menu.
-
Click Add groups claim and select the following options:
- In the Select group types to include in Access, ID, and SAML tokens area, select every option.
- In Customize token properties by type area, expand ID, Access, and SAML and then select Group ID for each type.
- Click Add.
- Encrypt the secret value you copied as a Kubernetes Secret on your Astronomer installation. See Store and encrypt identity provider secrets.
Step 3: Enable Microsoft Entra ID in your values.yaml file
Add the following values to your values.yaml file:Running behind an HTTPS proxy
Integrating an external identity provider with Astronomer requires that the platform’s Houston API component is able to make outbound HTTPS requests to those identity providers in order to fetch discovery documents, sign keys, and ask for user profile information upon login/signup. If your install is configured without a direct connection to the internet you will need to configure an HTTPS proxy server for Houston.Configure an HTTPS proxy server for Houston
To configure the proxy server used we need to set theGLOBAL_AGENT_HTTPS_PROXY Environment Variable for the Houston deployment.
To do so, add the following to the Houston section of the values.yaml file in your astronomer directory:
Configure a custom OAuth flow
Starting with Astronomer v0.27, you can set up a custom OAuth authorization flow as an alternative to Astronomer’s default implicit flow. You can customize Astronomer’s existing Okta, Google, and GitHub OAuth flows or import an entirely custom OAuth flow.This setup must be completed only during a scheduled maintenance window. There should be no active users on your installation until the setup has been finalized.
Step 1: Configure your authorization flow on Astronomer
To use a custom Oauth authorization code flow:-
In your
values.yamlfile, set theastronomer.houston.config.auth.openidConnect.flowvalue to"code": -
Configure the section of your
values.yamlfile specific to your identity provider with each of the following values:enabled: Set this value totrueunder the section for your own identity provider.clientIdandclientSecret: Your Client ID and Client secretdiscoveryURL: Your base Discovery URLauthUrlParams: Additional parameters to append to your discovery URL. At a minimum, you must configureaudience. Refer to your identity provider’s documentation for information on how to find this value (Auth0 maintains this information in their glossary, for example).
- Push your configuration changes to your platform as described in Apply a config change.
Step 2: Configure your identity provider
To finalize your configuration, configure the following key values in your identity provider’s settings:- Grant Code: Set to “Code” or “Auth Code” depending on your identity provider.
- Sign-in Redirect URI: Set to
https://houston.<BASE_DOMAIN>/v1/oauth/callback/. Be sure to include the trailing/.
Step 3: Confirm your installation
When you complete this setup, you should be able to see the differences in login flow when logging in at<BASE_DOMAIN>.astronomer.io.
If you configured a fully custom OAuth flow, you should see a new Log in with Custom Oauth button on the Astronomer login screen:
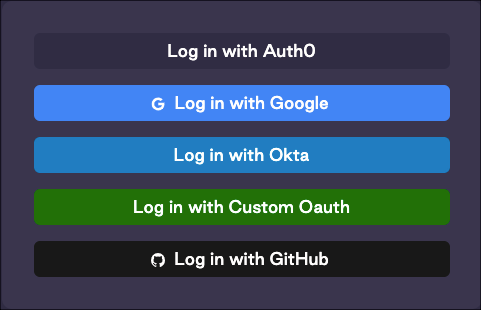
AUTH__OPENID_CONNECT__CUSTOM__DISPLAY_NAME when authenticating using the Astro CLI.
Manage users and Teams with SCIM
Astronomer Software supports integration with the open standard System for Cross-Domain Identity Management (SCIM). Using the SCIM protocol with Astronomer Software allows you to automatically provision and deprovision users and Teams based on templates that define permission and accesses. It also centralizes user management so that you can configure Astronomer user permissions directly from your identity provider (IdP).SCIM works because the IdP pushes updates about users and teams to Astronomer Software. This means your Astronomer Software platform must be connected to the internet to receive those updates. If you are running Astronomer Software without exposing it to the internet, there might be solutions for routing SCIM traffic depending on your combination of cloud provider and IdP. Contact Astronomer support for more information.
- Okta
- Microsoft Entra ID
- In Okta Admin dashboard, go to Applications > Applications.
- Click Browse App catalog
-
Search for
SCIM 2.0, then select the option that includes Basic Auth. The configuration page for the SCIM integration appears. - Complete the General Settings page, then click Next.
- Complete the Sign-On Options page and click Done.
- Return to the Applications menu and search for the integration you just created. Click the integration to open its settings.
- Click Provisioning, then click Configure API integration.
-
Tick the Enable API integration checkbox, then configure the following values:
- SCIM connector base URL:
https://astro-software-host/v1/scim/v2/okta - Authentication mode: Basic Auth
- Username:
<your-provisioning-account-username> - Password:
<your-provisioning-account-password>
- Username:
- SCIM connector base URL:
- Click General, then click Edit. Give your application a name and configure any other required general settings.
- Go to Push Groups page and create a rule for Group Push. See Group Push.
- On the Assignments tab, ensure that the right users and groups in your org are assigned to the app integration. See Use the Assign Users to App action.
-
Follow the steps in Store and encrypt identity provider secrets to store your provisioning account credentials as a Kubernetes secret. Your secret configuration should look similar to the following:
-
Add the following lines to your
values.yamlfile: - Push the configuration change. See Apply a config change.
Store and encrypt identity provider secrets
You can prevent your identity provider passwords, authorization tokens, and security keys from being exposed as plain text by encrypting them in Kubernetes secrets. This setup is primarily used for encrypting the required secrets for configuring a custom OAuth flow, but can also be used to encrypt any secrets used in your Helm configuration.-
Create a file named
secret.yamlthat contains the value you want to encrypt as a Kubernetes secret. For example, the following configuration encrypts the required client secret for configuring a custom OAuth flow for Okta. -
Run the following command to apply your secret to your Astronomer cluster:
-
Reference your secret name, key, and the environment variable you want the key to apply towards in your
values.yamlfile. To configure the example secret from Step 1 as an Okta client secret, you would add the following: - Save and push your changes. See Apply a config change.