Configure CI/CD on Astronomer Software
Users can push code and deploy to an Airflow Deployment on Astronomer using a Continuous Integration/Continuous Delivery (CI/CD) tool.
There are many benefits to deploying DAGs and other changes to Airflow via a CI/CD workflow. Specifically, you can:
- Deploy new and updated DAGs in a way that streamlines the development process amongst team members.
- Decrease the maintenance cost of integrating changes, allowing your team to quickly respond in case of an error or failure.
- Enforce continuous, automating testing, which increases code quality and protects your DAGs in production.
This guide will walk you through configuring a CI/CD pipeline on Astronomer.
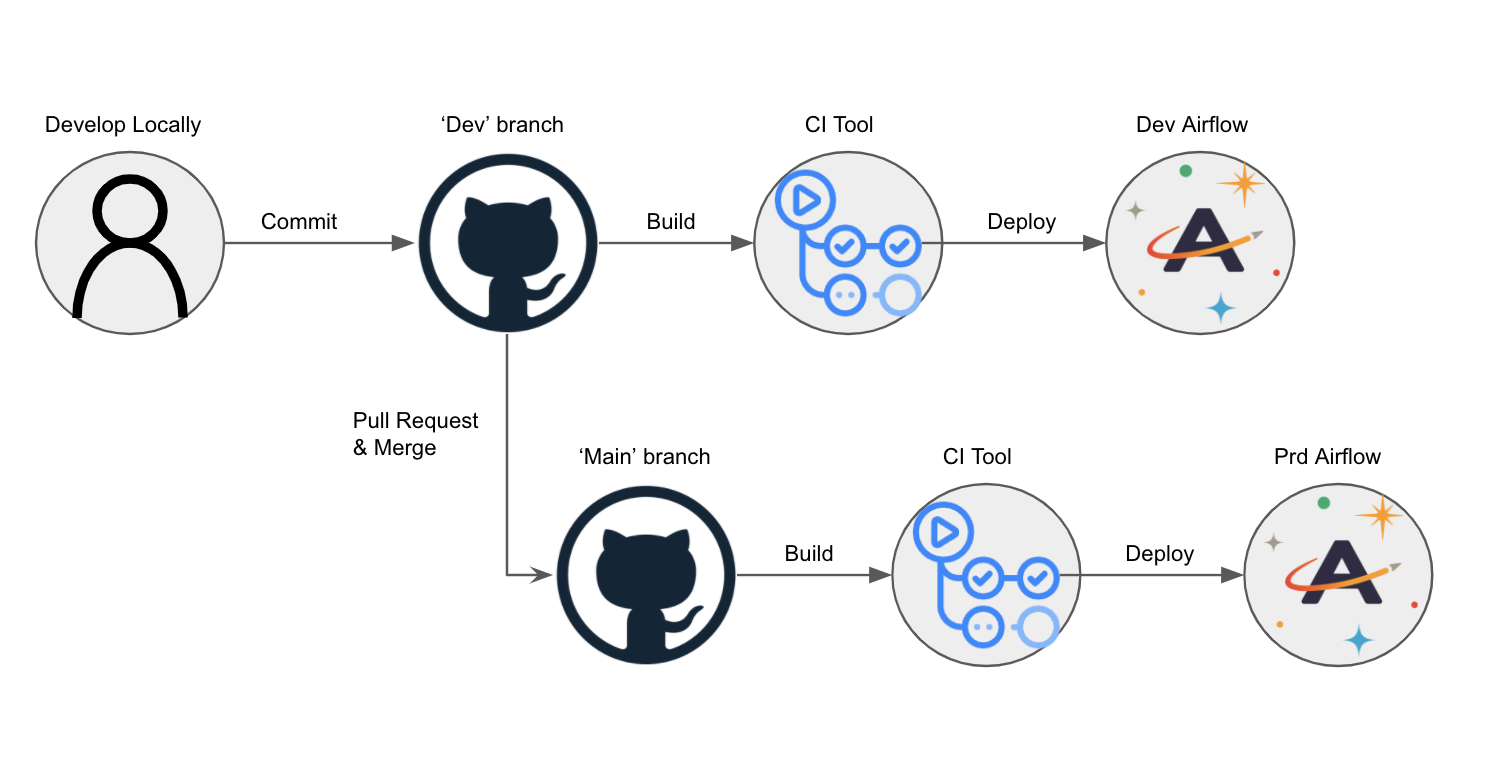
Example CI/CD workflow
Consider an Astro project hosted on GitHub and deployed to Astronomer. In this scenario, a set of dev and main branches of an Astro project are hosted on a single GitHub repository, and dev and prod Airflow Deployments are hosted on an Astronomer Workspace.
Using CI/CD, you can automatically deploy DAGs to your Airflow Deployment on Astronomer by pushing or merging code to a corresponding branch in GitHub. The general setup would look something like this:
- Create two Airflow Deployments within your Astronomer Workspace, one for
devand one forprod. - Create a repository in GitHub that hosts project code for all Airflow Deployments within your Astronomer Workspace.
- In your GitHub code repository, create a
devbranch off of yourmainbranch. - Configure your CI/CD tool to deploy to your
devAirflow Deployment whenever you push to yourdevbranch, and to deploy to yourprodAirflow Deployment whenever you merge yourdevbranch intomain.
That would look something like this:
CI/CD on Astronomer
Automating the deploy process to Astronomer starts with creating a Service Account, which will assume a user role and some set of permissions to your Workspace or Deployment.
From there, you’ll write a script that allows your service account to do the following:
- Build and tag a Docker Image
- Authenticate to a Docker Registry
- Push your image to that Docker Registry
From there, a webhook triggers an update to your Airflow Deployment using the CI/CD tool of your choice. The Astro CLI completes an authentication and push for every manual $ astro deploy command.
The rest of this guide describes how to create a service account and what your CI/CD script should look like based on the tool you’re using.
--provenance=false flag to your docker buildx build commands.Prerequisites
Before completing this setup, make sure you:
- Have access to a running Airflow Deployment on Astronomer.
- Installed the Astro CLI.
- Are familiar with your CI/CD tool of choice.
Step 1: Create a service account
In order to authenticate your CI/CD pipeline to Astronomer’s private Docker registry, you’ll need to create a service account and grant it an appropriate set of permissions. You can do so via the Software UI or CLI. Once created, you can always delete this service account at any time. In both cases, creating a service account will generate an API key that will be used for the CI/CD process.
Note that you’re able to create Service Accounts at the:
- Workspace Level
- Airflow Deployment Level
Creating a service account at the Workspace level allows you to deploy to multiple Airflow deployments with one code push, while creating them at the Deployment level ensures that your CI/CD pipeline only deploys to one particular deployment on Astronomer.
Read below for guidelines on how to create a service account via the CLI and via the Software UI.
Create a service account using the CLI
Deployment level service account
To create a Deployment Level Service account via the CLI, first run:
This will output the list of running Airflow deployments you have access to, and their corresponding UUID.
With that UUID, run:
Workspace level service account
To create a Workspace Level Service account via the CLI, first run:
This will output the list of running Astronomer Workspaces you have access to, and their corresponding UUID.
With that UUID, run:
Create a service account using the Software UI
If you prefer to provision a service account through the Software UI, start by logging into Astronomer.
Go to your Deployment’s “Configure” page
From the Software UI, navigate to: Deployment > Service Accounts
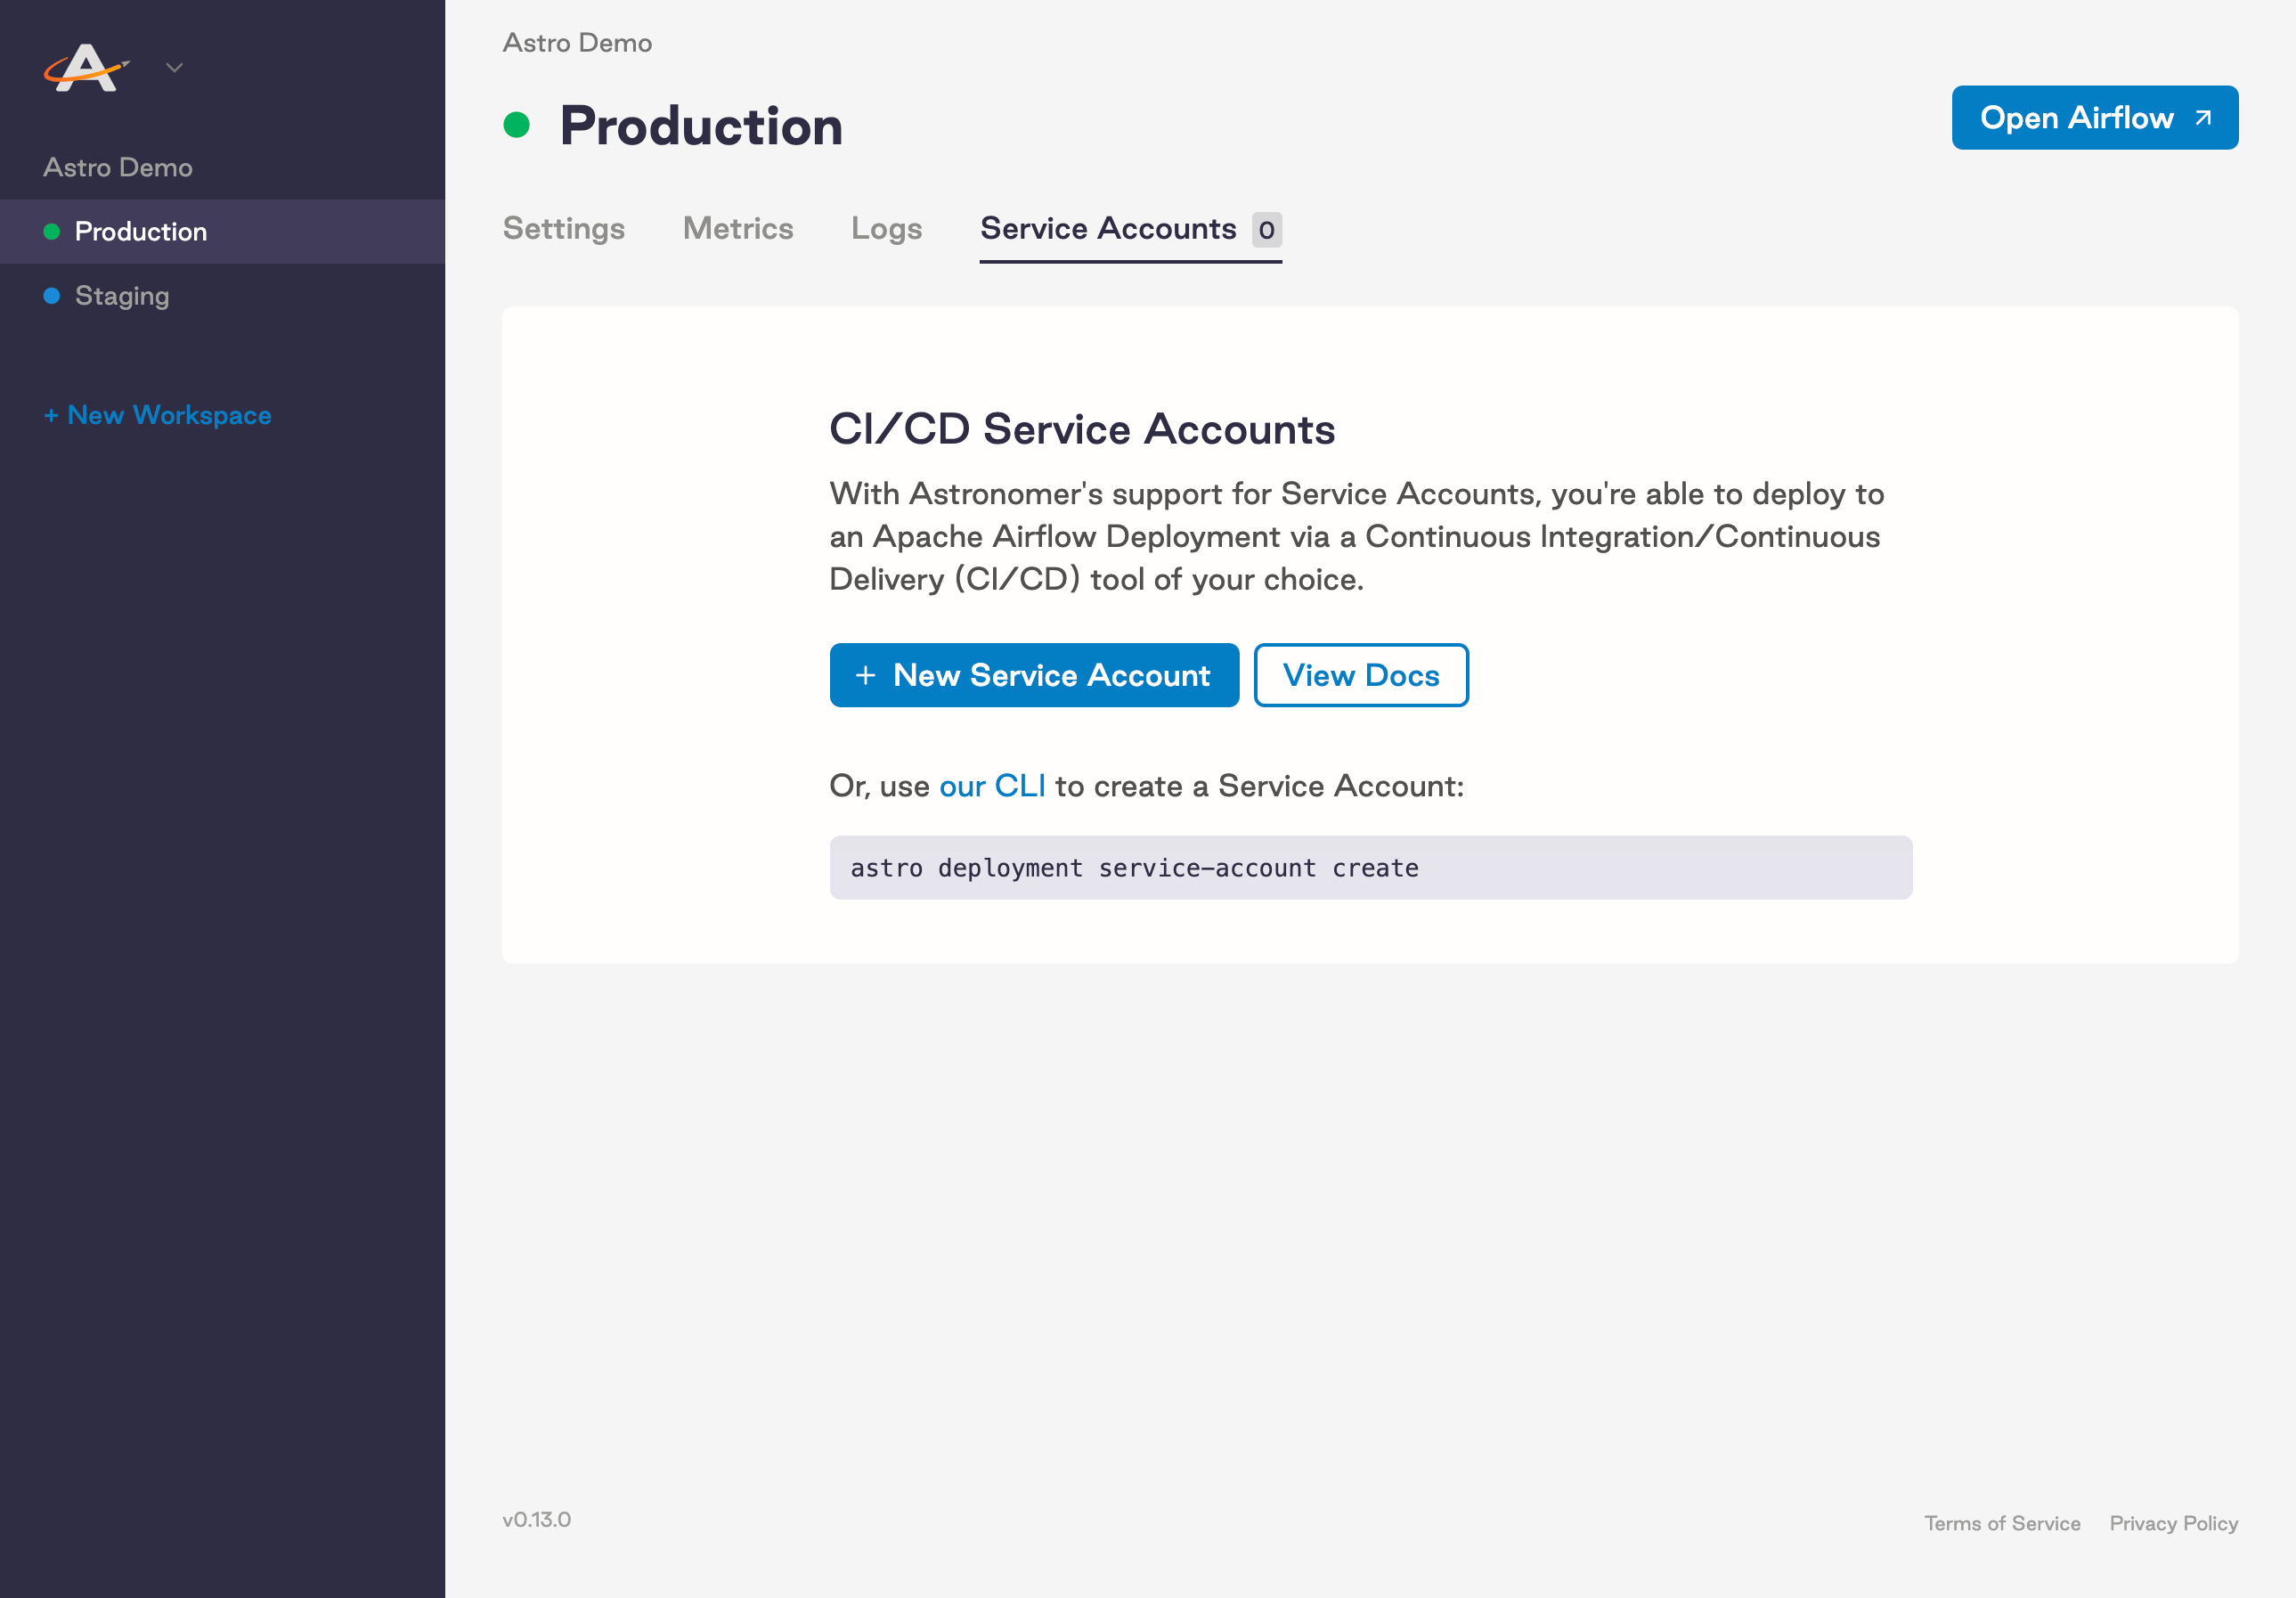
Configure your service account
Upon creating a Service Account, make sure to:
- Give it a Name
- Give it a Category (optional)
- Grant it a User Role

Copy the API key
Once you’ve created your new Service Account, grab the API key that was immediately generated. Depending on your use case, you might want to store this key in an Environment Variable or secret management tool of choice.

Step 2: Authenticate and push to Docker
The first step of this pipeline will authenticate against the Docker registry that stores an individual Docker image for every code push or configuration change:
In this example:
BASE_DOMAIN= The domain at which your Software instance is runningAPI_KEY_SECRET= The API key that you got from the CLI or the UI and stored in your secret manager
Building and pushing an image
Once you are authenticated you can build, tag and push your Airflow image to the private registry, where a webhook will trigger an update to your Airflow Deployment on the platform.
FROM statement of your project’s Dockerfile must be the same as the version of Airflow specified in your Astronomer Deployment. For more information on upgrading, read Upgrade Airflow.Registry address
Registry Address tells Docker where to push images to. On Astronomer Software, your private registry is located at registry.${BASE_DOMAIN}.
Release name
Release Name refers to the release name of your Airflow Deployment. It will follow the pattern of spaceyword-spaceyword-4digits (e.g. infrared-photon-7780).
Tag name
Tag Name: Each deploy to Astronomer generates a Docker image with a corresponding tag. If you deploy via the CLI, the tag will by default read deploy-n, with n representing the number of deploys made to that Airflow Deployment. If you’re using CI/CD, you get to customize this tag. We typically recommend specifying the source and the build number in the name.
In the example below, we use the prefix ci- and the ENV ${DRONE_BUILD_NUMBER}. This guarantees that we always know which CI/CD build triggered the build and push.
Example:
If you would like to see a more complete working example please visit our full example using Drone-CI.
Run unit tests
For CI/CD pipelines that push code to a production Deployment, Astronomer recommends adding a unit test after the image build step to ensure that you don’t push a Docker image with breaking changes. To run a basic unit test, add a step in your CI/CD pipeline that executes docker run and then runs pytest tests in a container that is based on your newly built image before it’s pushed to your registry.
For example, you can add the following command as a step in a Drone pipeline:
BASE_DOMAIN and RELEASE_NAME are pre-configured environment variables in the CI/CD tool, and DRONE_BUILD_NUMBER is an environment variable provided by the job execution in DroneCI.Step 3: Configure your CI/CD pipeline
Depending on your CI/CD tool, configuration will be slightly different. This section will focus on outlining what needs to be accomplished, not the specifics of how.
At its core, your CI/CD pipeline will first authenticate to Astronomer’s private registry and then build, tag and push your Docker image to that registry.
Example implementation
The following setup is an example implementation of CI/CD using GitHub Actions. These steps cover both the implementation and the workflow necessary to create a fully functional CI/CD pipeline.
-
Create a GitHub repository for an Astro project. Ensure your repo has a development branch and a main branch. In this example, the branches are named
devandmain. -
Create two Deployment-level service accounts: One for your Dev Deployment and one for your Production Deployment.
-
Follow instructions in GitHub documentation to add your service accounts as secrets to your repository. In the example below, these secrets are named
SERVICE_ACCOUNT_KEYandSERVICE_ACCOUNT_KEY_DEV. -
Go to the Actions tab of your GitHub repo and create a new action with a
main.ymlfile. To achieve the recommended workflow, use the following action:Ensure the branches match the names of the branches in your repository, and replace
<dev-release-name>and<prod-release-name>with the respective release names of your development and production Airflow Deployments on Astronomer. -
Test the GitHub Action by making a change on your
devbranch and committing that change. This should update your development Airflow Deployment on Astronomer, which you can confirm in the Software UI. If that update was successful, try opening a pull request and then mergingdevintomainto update your production Airflow Deployment. If both updates were successful, you now have a functioning, scalable CI/CD pipeline that can automatically deploy code to multiple Airflow Deployments.
The prod-push action as defined here will only run after merging a pull request from the dev branch as we recommend. To further restrict this pipeline, you can add branch protection settings in GitHub to limit whether your users can push directly to the main branch within your repository or your CI tool, or you can modify the action as needed.
The following sections provide basic templates for configuring single CI/CD pipelines using popular CI/CD tools. Each template can be implemented to produce a simple CI/CD pipeline similar to the one above, but they can also be reconfigured to manage any number of branches or Deployments based on your needs.
DroneCI
CircleCI
Jenkins Script
Bitbucket
If you are using Bitbucket, this script should work (courtesy of our friends at Das42)
Gitlab
AWS Codebuild
GitHub Actions CI/CD
GitHub supports a growing set of native CI/CD features in “GitHub Actions”, including a “Publish Docker” action that works well with Astronomer.
To use GitHub Actions on Astronomer, create a new action in your repo at .github/workflows/main.yml with the following:
$RELEASE_NAME in the example above with your deployment’s release name and to store your service account Key in your GitHub repo’s secrets according to this GitHub guide.Azure DevOps
In this example configuration, you can automatically deploy your Astro project from a GitHub repository using an Azure Devops pipeline connected to the GitHub repository.
To set up this workflow, make sure you have:
- A GitHub repository hosting your Astro project.
- An Azure DevOps account with permissions to create new pipelines.
-
Create a new file called
astro-devops-cicd.yamlin your Astro project repository with the following configuration: -
Follow the steps in Azure documentation to link your GitHub Repo and Action to an Azure pipeline. When prompted for the source code for your pipeline, specify that you have an existing Azure Pipelines YAML file and provide the setup tool with the file path to your
astro-devops-cicd.yamlfile. -
Finish and save your Azure pipeline setup.
-
In Azure, add environment variables for the following values:
BASE-DOMAIN: Your base domain for AstronomerRELEASE-NAME: The release name for your DeploymentSVC-ACCT-KEY: The service account you created on Astronomer for CI/CD
We recommend marking
SVC-ACCT-KEYas secret.
Once you complete this setup, any merges on the main branch of your GitHub repo will trigger the pipeline and deploy your changes to Astronomer.