ELT for Beginners: Extract from S3, Load to Databricks and Run Transformations
14 min read |
All data products need data. Whether you are creating dashboards showing critical company metrics or training the next generation of machine learning models, you need data - in the right system and in the right format.
This is the reason why ETL (extract-transform-load) and ELT (extract-load-transform) operations are the fundamental patterns in data engineering and implementing them is often the first task for beginner data engineers to work on.
Two very common tools used in ELT patterns are AWS S3 and Databricks. In fact, almost a third of respondents in the 2023 Airflow survey indicated that they are using Airflow with Databricks in their current pipelines.
One of the reasons for the popularity of this pattern is that the Databricks Airflow provider package includes many Airflow operators simplifying complex orchestration patterns, like running Databricks Notebooks as part of a Databricks Job, into just a few lines of DAG code.
This blog post shows how you can create a best-practice daily ELT pipeline to move data from S3 into Databricks and run transformations defined in Databricks Notebooks. You will need a Databricks workspace with Premium or Enterprise features enabled. Only basic Airflow and Python knowledge is required.
Common use cases
You can use this DAG to directly ingest data in any format supported by Databricks’ COPY INTO from AWS S3, Google Cloud Storage or Azure Blob Storage, to Databricks and perform transformations using Databricks notebooks. This pattern is versatile and applicable across various industries:
- FinTech - Anomaly Detection: Many financial firms store raw transaction logs in S3. This DAG can load those logs into Databricks, where machine learning models detect anomalies, flagging suspicious activity for further review.
- E-commerce - 360° Customer View: Modern e-commerce platforms collect diverse data on customer behavior, often stored in S3. This DAG ingests that data into Databricks, enabling further analysis and use in predictive models for tasks like churn prediction and personalized marketing.
- B2C Services - Recommendation System Fine-Tuning: B2C companies frequently refine recommendation models to better serve individual customers. This DAG can ingest historical customer data into Databricks, allowing teams to continuously fine-tune models with up-to-date user information, enhancing personalization.
Step 1 - Extracting data from S3
The first step to create our ELT pipeline is to start your free Astro Trial and prepare your S3 bucket with the sample data. In a real-world scenario, the data you use would likely already be at its location or delivered to it by another tool such as Apache Kafka.
1(a) Sign up for an Astro Free Trial
Sign up for a free trial of Astro with your business email address to get up to $20 in credits. Follow the onboarding flow, and when you get to the “Deploy Your First Project to Astro” step, select “ETL”. Then follow the instructions to connect Astro with your GitHub account. If you don’t have a GitHub account see the GitHub documentation for instructions on how to create a free one.
The onboarding process will generate an organization with a workspace and one Airflow deployment for you. The code is automatically synchronized with the GitHub repository you linked in the onboarding process, using Astro’s GitHub integration. You can push to the main branch of that GitHub repository to deploy changes to Airflow and you will add your S3 to Databricks ELT DAG to this deployment.
Note: You can set up the prerequisites outside of the trial flow by creating a new deployment with the Astro’s GitHub integration configured for it.
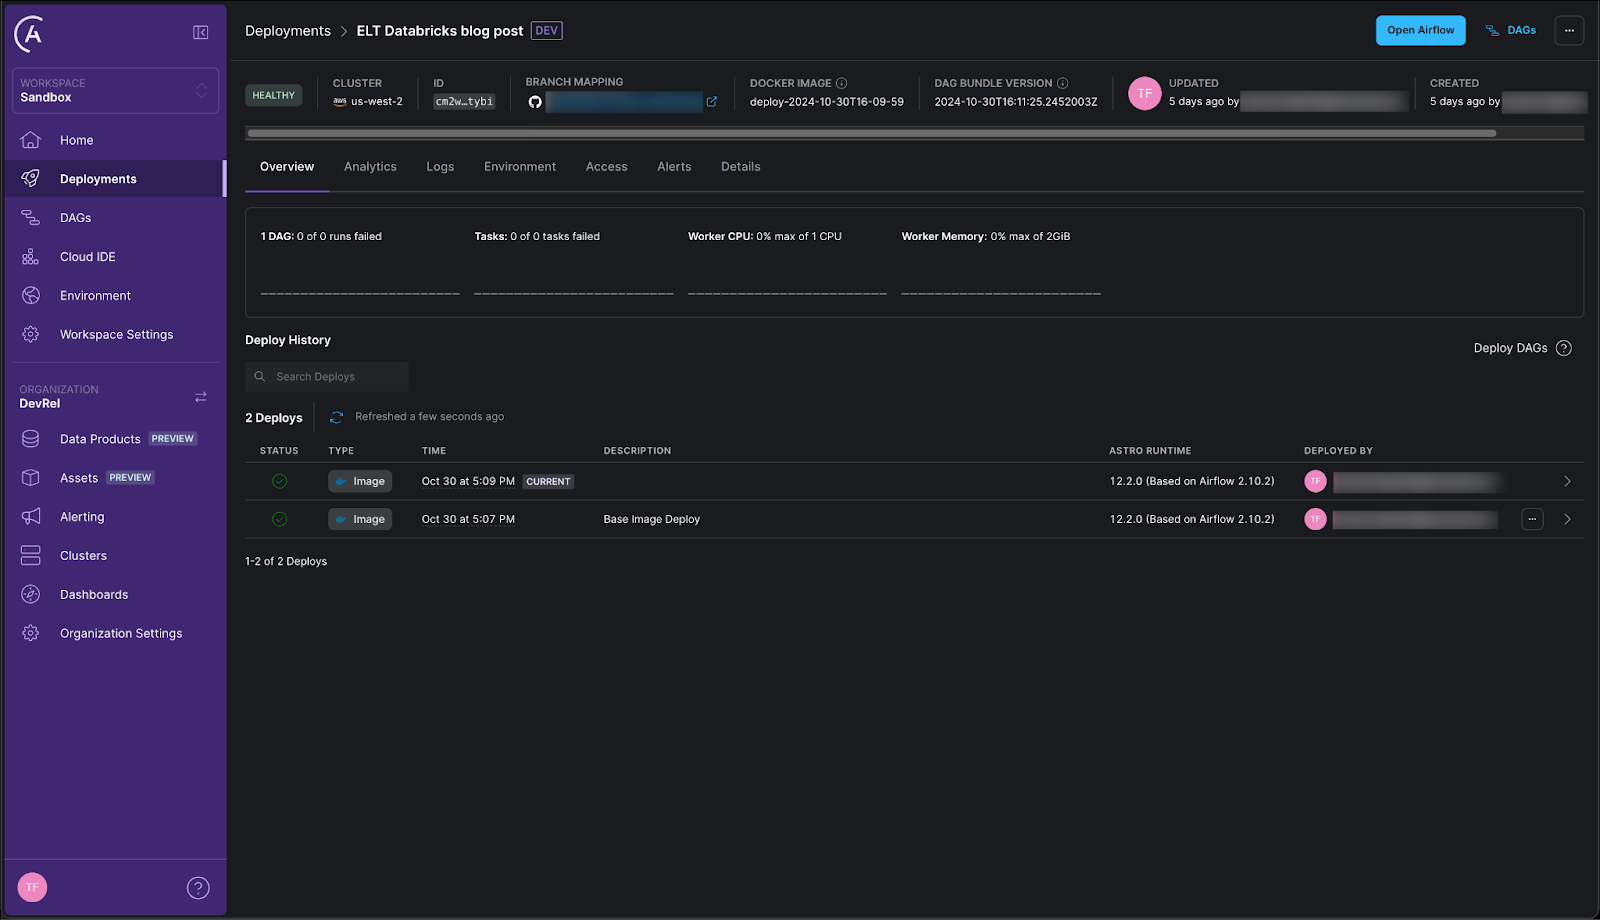
Tip: If you are familiar with S3 and Databricks and are looking to use the pattern of the DAG in this blog post for your own data rather than follow the tutorial, skip to Step 2(b) for the instructions on how to set up the Airflow connections and to Step 3(b) to get the DAG code.
1(b) Set up your S3 Bucket
Log into the AWS console. If you don’t have an AWS account you can create one for free here.
In your account, create a new S3 bucket using default settings. Next, download the demo data file containing sample data about Halloween candy from here and add it to the bucket.

To give Astro and Databricks access to your data, you need to create an IAM role with a policy attached that has the following permissions on your bucket and its objects:
{
	"Version": "2012-10-17",
	"Statement": [
		{
			"Effect": "Allow",
			"Action": [
				"s3:ListBucket"
			],
			"Resource": [
				"arn:aws:s3:::<your-bucket-name>"
			]
		},
		{
			"Effect": "Allow",
			"Action": [
				"s3:PutObject",
				"s3:GetObject",
				"s3:DeleteObject",
				"s3:PutObjectAcl"
			],
			"Resource": [
				"arn:aws:s3:::<your-bucket-name>/*"
			]
		}
	]
}
This is the role Airflow assumes within your DAG to create temporary credentials to access the S3 bucket. Additionally, you need to set up static credentials (an AWS Access key and AWS secret key ) for a user that has permission to assume this role. See the AWS documentation for further instructions.
Make sure to save an AWS Access key and AWS secret key for your user in a secure location to use later in this tutorial.
Tip: If you prefer not to use static credentials, Astro offers a Managed Workload Identity for AWS for seamless networking. See the Astro documentation for more information.
Step 2 - Loading the data into Databricks
Now that the source data is ready in S3, next you prepare your loading destination in Databricks and the connection between Databricks and Airflow.
2(a) Set up Databricks
Log into your Databricks account. If you don’t have an account already, you can create one here. Note that in order to run the DAG in this tutorial your Databricks account needs to be at least at the Premium tier.
If you don’t have one already, create a Workspace inside of your Databricks account and within it a serverless SQL warehouse.

Click on the name of your SQL warehouse and navigate to the Connection details to find the connection information needed in Step 2(b). Copy both the Server hostname, as well as the HTTP path.
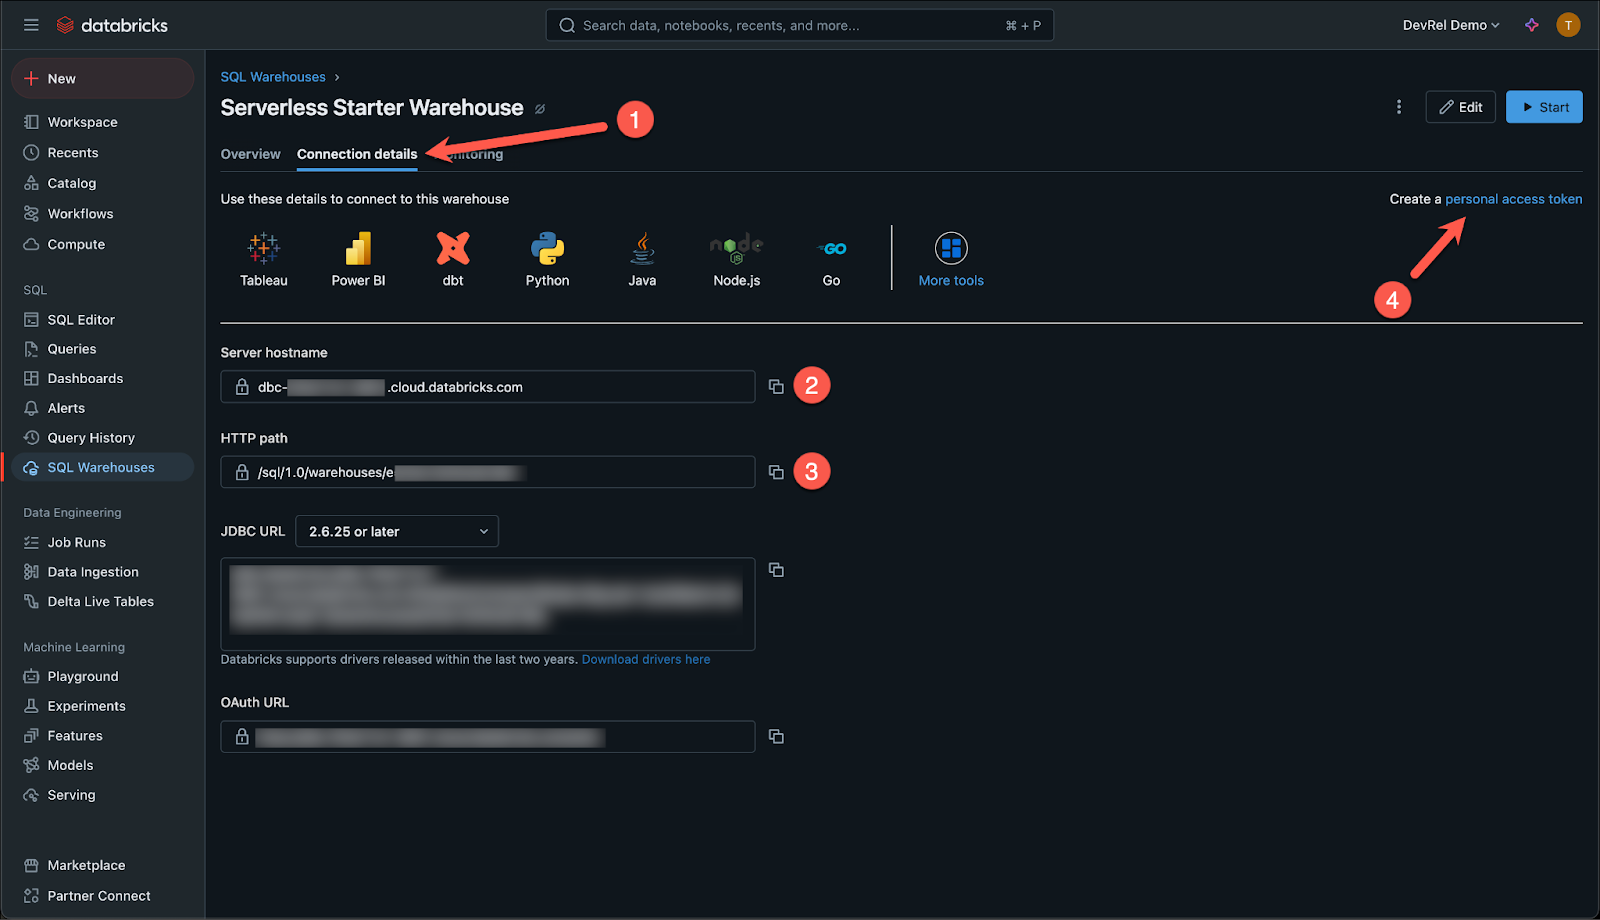
Lastly you’ll need to create a personal access token by clicking on the link marked with 4 in the image above. Make sure to store the token in a secure location.
Awesome, the loading destination is prepared, let’s connect Airflow to both Databricks and S3!
2(b) Define Airflow Connections on Astro
Astro makes it easy to define Airflow connections using the Astro Environment Manager!
In the Astro UI click on the Environment tab, then on + Connection to add a new connection.

In the connection options select Databricks.
Fill out the form with the following:
- CONNECTION ID:
databricks_default - HOST: your server hostname in the format
https://my-cluster.cloud.databricks.com/ - PASSWORD: your Databricks personal access token
- HTTP PATH (visible after clicking “More options”): your HTTP path to your Databricks SQL warehouse
Make sure to turn the toggle AUTOMATICALLY LINK TO ALL DEPLOYMENTS at the top to Yes to make this connection available to all your deployments.
Click Create Connection.
Lastly, you also need to define a connection between Airflow and AWS S3 to generate the temporary credentials used to copy data from S3 into Databricks.
Navigate back to the Astro Environment Manager and add a second connection.
This time select AWS and use the connection ID aws_default together with the same AWS KEY ID and AWS SECRET KEY that you created for your user in Step 1(b). Link this connection to all deployments as well.
Awesome! All tools are set and connected, let’s get the code!
2© Clone your GitHub Repository
Clone the GitHub repository you connected to Astro in step 1(a) to your local machine to make code changes. If you cannot use git locally due to organizational constraints, you can also open the repository in a GitHub codespace and edit the code there.
This repository already contains a fully functional Airflow project and you can add the ELT DAG to it in Step 3.
Step 3 - Transform your data in Databricks
The DAG you will add orchestrates both, the ingestion of data from S3 to Databricks, as well as data transformation. The transformations are run using Databricks notebooks run in a Databricks job created and orchestrated by Airflow.
3(a) Add Databricks Notebooks
In Databricks, create two new notebooks: candy_notebook_1 and candy_notebook_2 in your User’s folder.

Copy the following code into the candy_notebook_1. You can use separate cells or one big cell. This code reads the raw data ingested, transforms it to calculate total candy output and average tastiness per house, and saves the transformed data in a new table called candy_per_house.
from pyspark.sql.types import IntegerType, FloatType
from pyspark.sql.functions import col, sum, avg
df = spark.sql("SELECT * FROM hive_metastore.default.halloween_candy")
df = df.withColumn("House_1_Amount", col("House_1_Amount").cast(IntegerType()))
df = df.withColumn("House_1_Tastiness_Rating", col("House_1_Tastiness_Rating").cast(FloatType()))
df = df.withColumn("House_2_Amount", col("House_2_Amount").cast(IntegerType()))
df = df.withColumn("House_2_Tastiness_Rating", col("House_2_Tastiness_Rating").cast(FloatType()))
df = df.withColumn("House_3_Amount", col("House_3_Amount").cast(IntegerType()))
df = df.withColumn("House_3_Tastiness_Rating", col("House_3_Tastiness_Rating").cast(FloatType()))
stats_df = (
df.select(
col("House_1_Amount").alias("Candy_Amount_H1"),
col("House_1_Tastiness_Rating").alias("Tastiness_H1"),
col("House_2_Amount").alias("Candy_Amount_H2"),
col("House_2_Tastiness_Rating").alias("Tastiness_H2"),
col("House_3_Amount").alias("Candy_Amount_H3"),
col("House_3_Tastiness_Rating").alias("Tastiness_H3"),
)
.agg(
sum(col("Candy_Amount_H1")).alias("Total_Candy_H1"),
avg(col("Tastiness_H1")).alias("Avg_Tastiness_H1"),
sum(col("Candy_Amount_H2")).alias("Total_Candy_H2"),
avg(col("Tastiness_H2")).alias("Avg_Tastiness_H2"),
sum(col("Candy_Amount_H3")).alias("Total_Candy_H3"),
avg(col("Tastiness_H3")).alias("Avg_Tastiness_H3"),
)
.withColumnRenamed("Total_Candy_H1", "House_1_Total_Candy")
.withColumnRenamed("Avg_Tastiness_H1", "House_1_Avg_Tastiness")
.withColumnRenamed("Total_Candy_H2", "House_2_Total_Candy")
.withColumnRenamed("Avg_Tastiness_H2", "House_2_Avg_Tastiness")
.withColumnRenamed("Total_Candy_H3", "House_3_Total_Candy")
.withColumnRenamed("Avg_Tastiness_H3", "House_3_Avg_Tastiness")
)
stats_df.write.mode("overwrite").saveAsTable("hive_metastore.default.candy_per_house")
The second notebook retrieves the transformed data from the second table and creates a visualization. Copy the following code into the candy_notebook_2.
import matplotlib.pyplot as plt
stats_df = spark.sql("SELECT * FROM hive_metastore.default.candy_per_house").toPandas()
plt.figure(figsize=(8, 6))
plt.bar(["House 1", "House 2", "House 3"],
[stats_df['House_1_Total_Candy'][0], stats_df['House_2_Total_Candy'][0], stats_df['House_3_Total_Candy'][0]])
plt.xlabel("House")
plt.ylabel("Total Candy Collected")
plt.title("Total Candy Collected by House")
plt.show()
plt.figure(figsize=(8, 6))
plt.bar(["House 1", "House 2", "House 3"],
[stats_df['House_1_Avg_Tastiness'][0], stats_df['House_2_Avg_Tastiness'][0], stats_df['House_3_Avg_Tastiness'][0]])
plt.xlabel("House")
plt.ylabel("Average Tastiness Rating")
plt.title("Average Tastiness Rating by House")
plt.show()
3(b) Add your Databricks ELT DAG
To deploy new DAGs to your Astro Deployment, you can add them to the GitHub repository that was mapped when you created your Astro trial.
The GitHub repository contains several folders and files, you only need to make changes to a few to create the S3 to Databricks ELT DAG.
At the root of the repository you will find a file called requirements.txt; this is where you can add any pypi package that needs to be available to your DAGs.
In the requirements.txt file, add the following lines to install the Amazon Airflow provider and the Databricks Airflow provider.
apache-airflow-providers-amazon==9.1.0
apache-airflow-providers-databricks==6.13.0
Next, create a new file in the DAGs folder called elt_databricks.py. Copy the DAG code below into the file and provide your own values in the Configuration section for:
_NOTEBOOK_PATH_ONE: The path to your first Databricks notebook. Note that this path needs to be absolute._NOTEBOOK_PATH_TWO: The path to your second Databricks notebook._S3_BUCKET: Your bucket name._DBX_WH_HTTP_PATH: Your Databricks SQL Warehouse endpoint._S3_BUCKET_ACCESS_ROLE_ARN: The ARN of the AWS role your user will assume to access the S3 bucket.
This DAG uses the Airflow Databricks provider to simplify interacting with Databricks from within Airflow:
- The DatabricksSqlOperator is used to run SQL creating a table in Databricks
- The DatabricksCopyIntoOperator is used to copy the sample data from S3 to Databricks
- The DatabricksNotebookOperator is used inside a DatabricksWorkflowTaskGroup to run Databricks notebooks as a Databricks job, leveraging cheaper Workflows compute.
Lastly, commit the changes to the main branch of the Github repository.
"""
## ELT S3 to Databricks
This DAG demonstrates how to orchestrate an ELT pipeline from S3 to Databricks.
Steps:
1. Create a table in Databricks
2. Retrieve temporary credentials for S3 access
3. Copy data from S3 to Databricks (Extract and Load)
4. Run two Databricks notebooks in a Databricks Job (Transform)
"""
from airflow.decorators import dag, task
from airflow.models import Variable
from airflow.models.baseoperator import chain
from airflow.providers.amazon.aws.hooks.base_aws import AwsGenericHook
from airflow.providers.databricks.operators.databricks import DatabricksNotebookOperator
from airflow.providers.databricks.operators.databricks_sql import (
DatabricksCopyIntoOperator,
DatabricksSqlOperator,
)
from airflow.providers.databricks.operators.databricks_workflow import (
DatabricksWorkflowTaskGroup,
)
from pendulum import datetime
# ----------------------------------- START CONFIG ------------------------- #
# TODO replace with your values
_NOTEBOOK_PATH_ONE = "/Users/<your-email>/candy_notebook_1"
_NOTEBOOK_PATH_TWO = "/Users/<your-email>/candy_notebook_2"
_S3_BUCKET = "<your-bucket-name>"
_DBX_WH_HTTP_PATH = "/sql/1.0/warehouses/<your-endpoint>"
_S3_BUCKET_ACCESS_ROLE_ARN = "arn:aws:iam::<your-acct-id>:role/<your-role-id>"
# ----------------------------------- END CONFIG --------------------------- #
_DBX_CONN_ID = "databricks_default"
_DATABRICKS_JOB_CLUSTER_KEY = "test-cluster"
_DATABRICKS_TABLE_NAME = "halloween_candy"
_S3_INGEST_KEY_URI = f"s3://{_S3_BUCKET}/"
job_cluster_spec = [
{
"job_cluster_key": _DATABRICKS_JOB_CLUSTER_KEY,
"new_cluster": {
"cluster_name": "",
"spark_version": "15.3.x-cpu-ml-scala2.12",
"aws_attributes": {
"first_on_demand": 1,
"availability": "SPOT_WITH_FALLBACK",
"zone_id": "eu-central-1",
"spot_bid_price_percent": 100,
"ebs_volume_count": 0,
},
"node_type_id": "i3.xlarge",
"spark_env_vars": {"PYSPARK_PYTHON": "/databricks/python3/bin/python3"},
"enable_elastic_disk": False,
"data_security_mode": "LEGACY_SINGLE_USER_STANDARD",
"runtime_engine": "STANDARD",
"num_workers": 1,
},
}
]
@dag(
dag_display_name="ELT Databricks",
start_date=datetime(2024, 11, 1),
schedule="@daily",
catchup=False,
tags=["DBX"],
)
def elt_databricks():
@task
def get_tmp_creds(role_arn):
from airflow.models import Variable
session_name = "airflow-session"
hook = AwsGenericHook(aws_conn_id="aws_default")
client = hook.get_session().client("sts")
response = client.assume_role(RoleArn=role_arn, RoleSessionName=session_name)
credentials = response["Credentials"]
Variable.set(key="AWSACCESSKEYTMP", value=credentials["AccessKeyId"])
Variable.set(key="AWSSECRETKEYTMP", value=credentials["SecretAccessKey"])
Variable.set(key="AWSSESSIONTOKEN", value=credentials["SessionToken"])
get_tmp_creds_obj = get_tmp_creds(role_arn=_S3_BUCKET_ACCESS_ROLE_ARN)
create_table_delta_lake = DatabricksSqlOperator(
task_id="create_table_delta_lake",
databricks_conn_id=_DBX_CONN_ID,
http_path=_DBX_WH_HTTP_PATH,
sql="""CREATE TABLE halloween_candy (
Kid STRING,
Costume STRING,
House_1_Candy STRING,
House_1_Amount INT,
House_1_Tastiness_Rating INT,
House_2_Candy STRING,
House_2_Amount INT,
House_2_Tastiness_Rating INT,
House_3_Candy STRING,
House_3_Amount INT,
House_3_Tastiness_Rating INT
);""",
)
s3_to_delta_lake = DatabricksCopyIntoOperator(
task_id="s3_to_delta_lake",
databricks_conn_id=_DBX_CONN_ID,
table_name=_DATABRICKS_TABLE_NAME,
file_location=_S3_INGEST_KEY_URI,
file_format="CSV",
format_options={"header": "true", "inferSchema": "true"},
force_copy=True,
http_path=_DBX_WH_HTTP_PATH,
credential={
"AWS_ACCESS_KEY": Variable.get("AWSACCESSKEYTMP", "Notset"),
"AWS_SECRET_KEY": Variable.get("AWSSECRETKEYTMP", "Notset"),
"AWS_SESSION_TOKEN": Variable.get("AWSSESSIONTOKEN", "Notset"),
},
copy_options={"mergeSchema": "true"},
)
dbx_workflow_task_group = DatabricksWorkflowTaskGroup(
group_id="databricks_workflow",
databricks_conn_id=_DBX_CONN_ID,
job_clusters=job_cluster_spec,
)
with dbx_workflow_task_group:
transform_one = DatabricksNotebookOperator(
task_id="transform_one",
databricks_conn_id=_DBX_CONN_ID,
notebook_path=_NOTEBOOK_PATH_ONE,
source="WORKSPACE",
job_cluster_key=_DATABRICKS_JOB_CLUSTER_KEY,
)
transform_two = DatabricksNotebookOperator(
task_id="transform_two",
databricks_conn_id=_DBX_CONN_ID,
notebook_path=_NOTEBOOK_PATH_TWO,
source="WORKSPACE",
job_cluster_key=_DATABRICKS_JOB_CLUSTER_KEY,
)
chain(transform_one, transform_two)
chain(
[create_table_delta_lake, get_tmp_creds_obj],
s3_to_delta_lake,
dbx_workflow_task_group,
)
elt_databricks()
3© Run the DAG
Great, you are all set to turn on your DAG in the Airflow UI! In the Astro UI navigate to your deployment and click Open Airflow to open the Airflow UI.
In the Airflow UI, click the toggle to the left of the DAG titled ELT Databricks to unpause it and see it run. Note that it can take several minutes for the Databricks cluster running the transformation step to spin up.
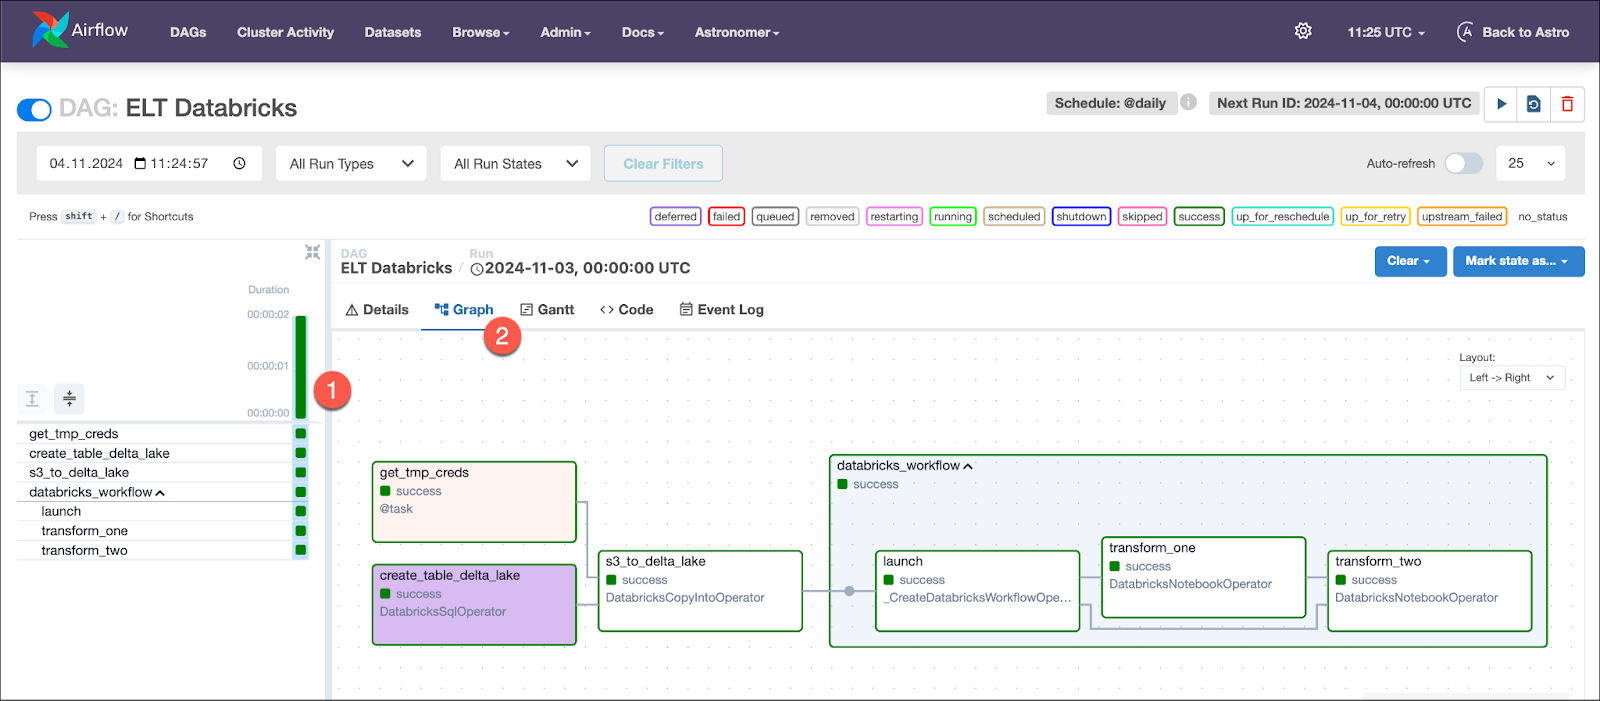
Click on the DAG name, the green bar of the completed DAG run and then on the Graph tab to see the graph of your successful DAG run.
3(d) View your results
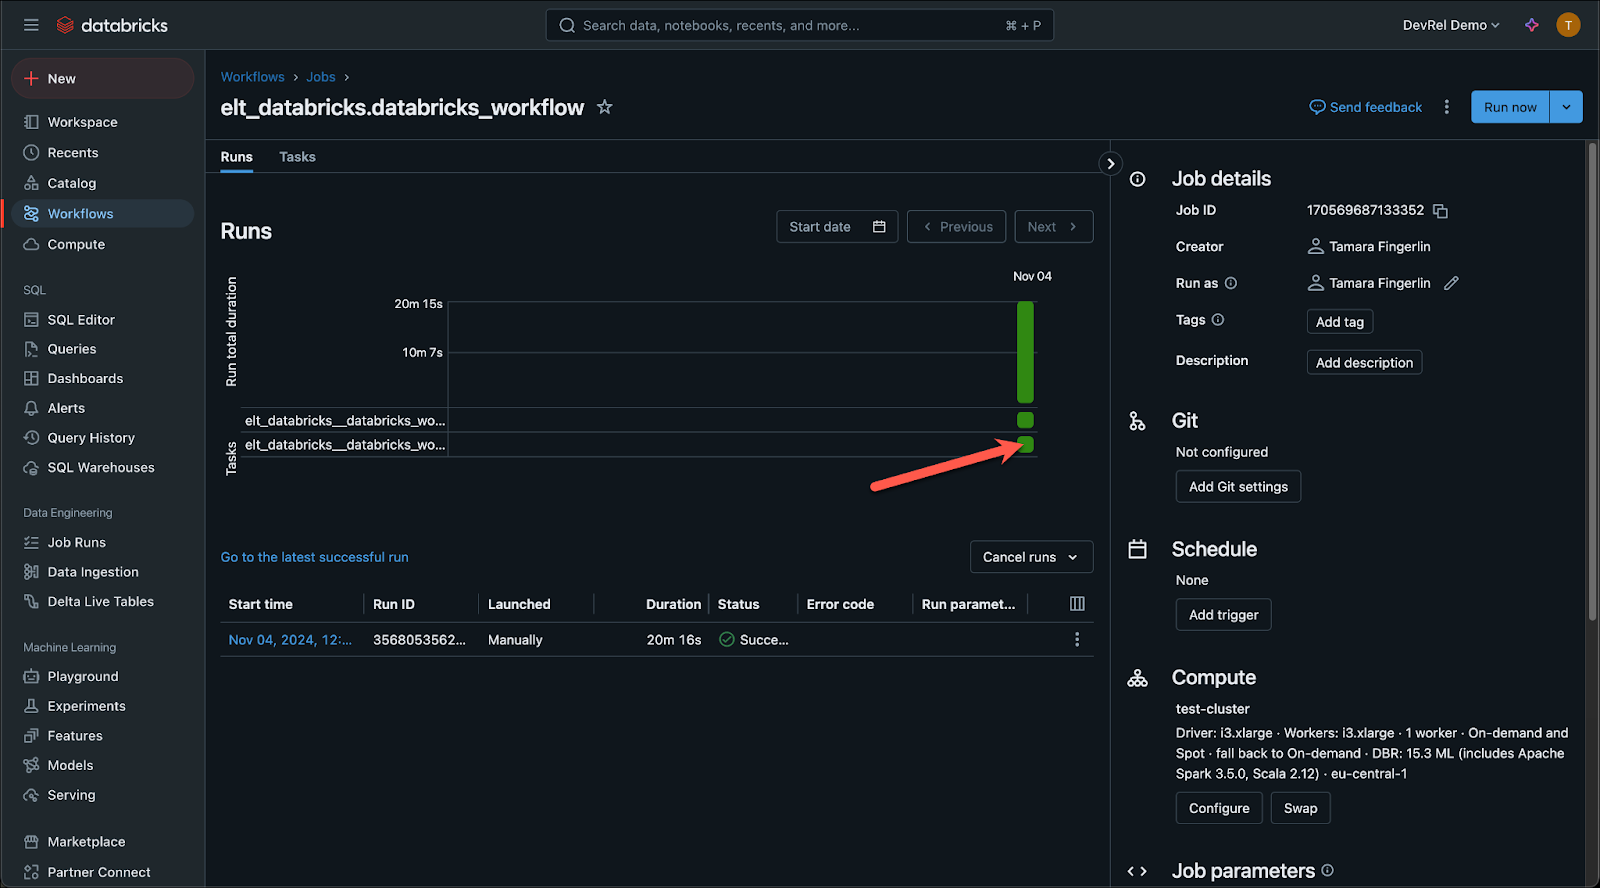
In Databricks, navigate to your Databricks job and click on the second green square to open the notebook run for the second notebook, creating a visualization of total candy and average tastiness rating by house.
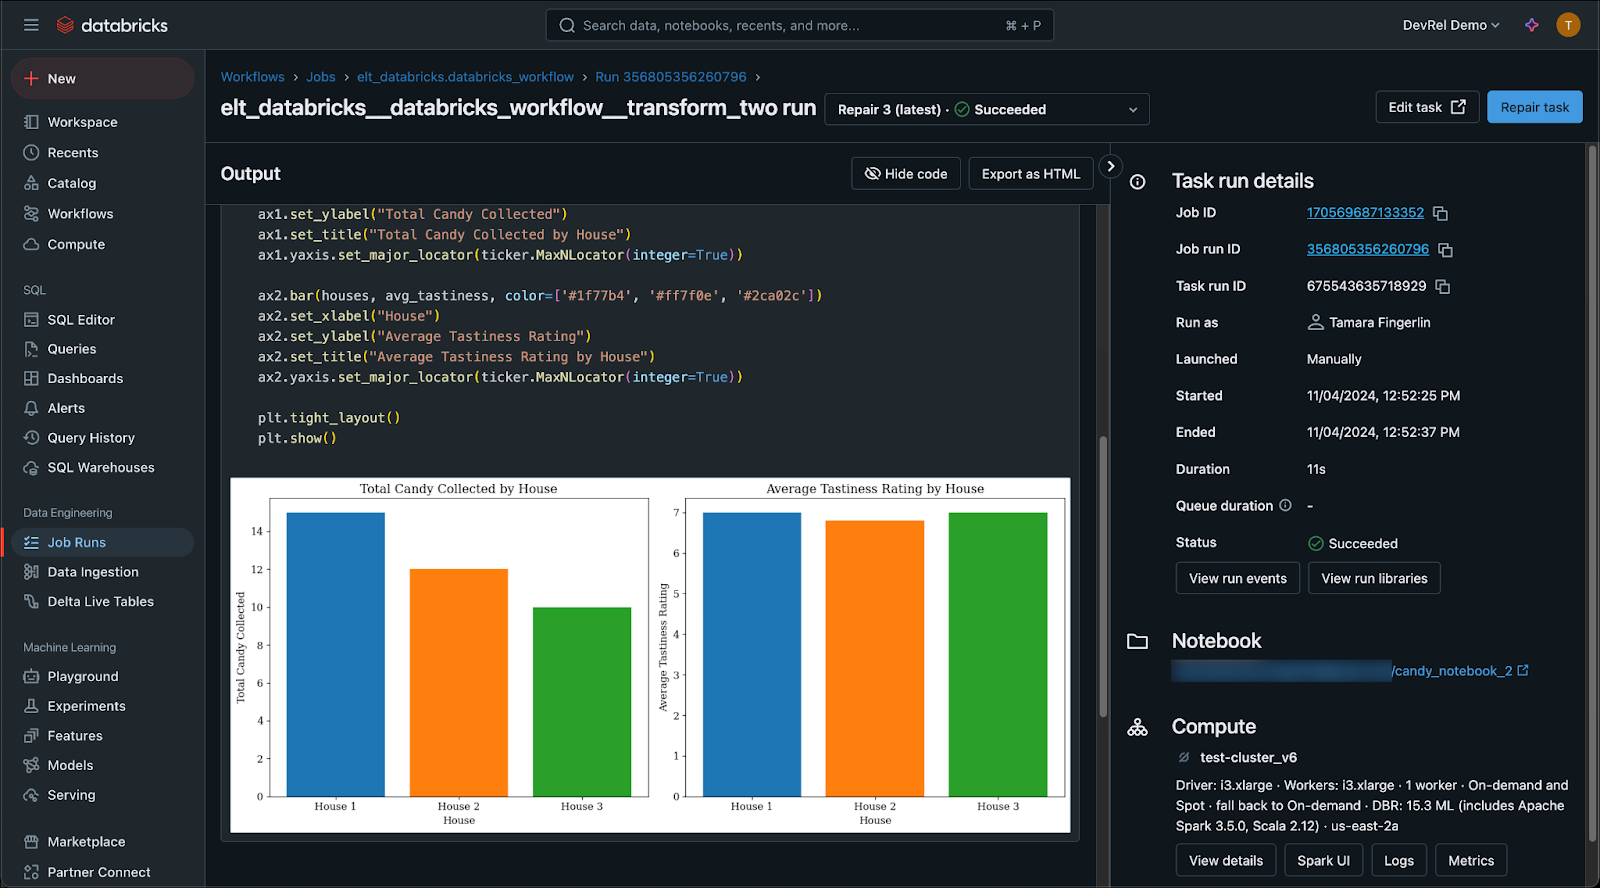
Awesome! You ran your ELT DAG ingesting data from S3 into Databricks and performing a transformation using a Databricks job!
How to adapt this DAG to your use case
The DAG in this blog post will load all CSVs located at the root of the s3://<YOUR BUCKET NAME>/ key to a newly created table in Databricks.
There are many options to adapt this DAG to fit your data and use case:
- Your target table has a different schema: You likely will want to ingest your own data that is not about halloween candy. To change the schema, adjust the sql parameter in the
create_table_delta_lake task created with the DatabricksSqlOperator to fit your data.
Important: Make sure that the columns in your table definition are in the same order as the columns in your CSV file!
- Your data is in another format than CSV: If your raw data in S3 is in a different format, such as JSON, Parquet or XML, you will need to adjust the
file_format parameter of the DatabricksCopyIntoOperator. See the Databricks documentation for all format options.
- Your data is in a different object storage location: While this blog post deals with extracting data from S3, the DAG shown is easily adaptable to data located in GCP or Azure. You will need to adjust the
file_location as well as credential parameters in the DatabricksCopyIntoOperator and create your temporary credentials for a different object storage solution in the get_tmp_creds task.
- You want to run other transformations: To change the transformations run on your data create your own Databricks notebooks and add them to the Databricks job created by the ELT DAG by adding more tasks using the DatabricksNotebookOperator in the DatabricksWorkflowTaskGroup. See the Orchestrate Databricks jobs with Airflow tutorial for more information.
Next Steps
To learn more about how to use Apache Airflow together with Databricks, watch the the How to orchestrate Databricks jobs webinar.
Build, run, & observe your data workflows.
All in one place.
